Thursday, October 31, 2019

Helmeted Character: Week 2 Thursday

On Thursday I started working on the Helmet in 3ds max, making a turbosmoothed blockout before exporting it into zbrush to sculpt further:


I box modelled the majority of the helmet by spherifying a cube, using inset and extruding out areas like the snout, visor, and concave areas. I strip modelled out the cushioned area, detached it and then applied a shell modifier to add thickness. I then applied symmetry and turbosmooth; strategically placing swiftloops and chamfers in areas that needed sharper edges. Finally, I collapsed everything, deleted any excess backup cloned versions and exported each of the parts in a bundled .obj file so that I could work on them separately as subtools in zbrush.


Wednesday, October 30, 2019

Helmeted Character: Week 2 Wednesday

At this point I decided to take another shot at Marvelous, getting as far as learning how to set custom arrangement points and bounding volumes to my mesh. I decided to test a default long sleeve shirt on my mesh, with the understanding that the character will be wearing a long sleeve jacket and a shirt by the end of the project. I immediately encountered a problem in which the sleeves clipped outside of the arms and wouldn't preposition themselves anywhere else mo matter how hard I tugged at them.


because of this, I decided to ditch marvelous this time and go back to what I was more comfortable with for this project.

Tuesday, October 29, 2019

Helmeted Character: Week 2 Tuesday

WIP
On Tuesday I started sculpting the gloves, using the same techniques I had learnt from the shoes to mask off areas and sculpt in layers of detail for the leather shapes. I decided to slightly edit the concept image to add more interest to the gloves, with varying layers based on biking gloves:


Monday, October 28, 2019

Helmeted Character: Week 2 Monday

I continued sculpting the shoes on monday, getting further into the details of the sculpt.
Once again, I used layers to add stitching and other surface details. To optimize this, I subdivided before entering layer mode so that I would still be able to access my lower subdivisions while sculpting. I used the IMM curve strap to make a blockout of one half of the laces, then carefully moved them into place with the move elastic tool and pinch.

For these shoes, I mostly referenced these images:

Friday, October 25, 2019

Helmeted Character: Week 1 Friday

On Friday, I started sculpting the shoes loosely following this guide so that they would be crisp with a flat sole.
With this tutorial I learnt how to use the bend tool to create the bend in the sole, and mask gradients to move sections of the sculpt around.
I used the extract tool for the different parts of the shoe, making sure to create new polygroups in case I needed those areas again. When it came to the detailing stage, I masked off areas with the lasso tool and used the layer brush to take away an even amount of the inverted mask. For the bulging areas I used form soft and dam standard.

Thursday, October 24, 2019

Helmeted Character: Week 1 Thursday

On thursday I went back into zbrush and extracted the pants. I decided to use reference with a more shiny material so that it would be easier to identify where the folds are:

I then noticed that the folds were too extreme, so I smoothed, dam standarded and pinched areas until I had some well defined folds that weren't too sharp as a good middleground between the reference image and the concept.


Wednesday, October 23, 2019

Helmeted Character: Week 1 Wednesday

On Wednesday I felt particularly ill and had to take the day off, but not before exporting the character sculpt into Marvelous to replace the default model:
After messing around with the program for a bit, I decided that it was too much of a risk to spend too much time learning it while I'm on a schedule. I chose to spend the next day sculpting the joggers in zbrush and to re-evaluate whether or not I should use marvelous later in the project when I'm making the jacket and shirt, as those would have more areas that hang off of the body.

Tuesday, October 22, 2019

Helmeted Character: Week 1 Tuesday

On Tuesday I opened zbrush and created a blockout from a zsphere, paying attention to the anatomy reference on my pureref file:
I wanted to use this time to practice sculpting bodies and to get back into the flow of zbrush, so I decided to loosely sculpt in some muscle definition before making the clothes:

 I didn't want to waste too much time on muscles that wouldn't be seen later in the sculpt, so I stopped here and moved onto testing whether or not marvelous would be a good choice for my next step.

Monday, October 21, 2019

Helmeted Character: Week 1 Monday

I used Monday to gather up reference material for the sculpt and to find the concept I wanted to use. I created a pureref file based around a concept by Catlesstail on twitter:
Image
As the concept was a helmeted character and the head on the concept seemed to be a little too small to fit a human head inside, I decided to adapt the proportions a little to fit the brief.
Now that the concept had been decided upon, I went on a research binge to find as much real life reference as possible to strengthen the concept, especially in terms of materials.
I paid particular attention to obtaining multiple views of different kinds of clothes so that I could combine them into a cohesive sculpt.

Friday, October 18, 2019

Water VFX: Week 3 Friday

On Friday I did a quick bake in marmoset, textured and set everything up in my temporary scene:

I edited the parameters and the texture map tiling size so that the VFX would fit within the buckets, and positioned all of my assets into a small environment to showcase the water:


I didn't have enough time to apply the reactive ripple blueprint to the shallow water on the plinth, but will be adding that in the future. I also intend to delete all of the temporary test content and add post processing to create a more dynamic scene.

Thursday, October 17, 2019

Water VFX: Week 3 Thursday

On Thursday I imported the normal map .psd and lowpoly .obj from marmoset into substance painter and began texturing. Because I wanted a stylised effect, I hand painted the majority of the model using both the 2D UV view and the 3D viewport, making sure to pay attention to the PBR aspects of each layer. I also used some smart masks and created my own masks using the curvature map and levels for edge highlights and cavity lowlights.
I added texture information where the water of the VFX would be touching the metal and wood, making wet areas darker and more reflective in areas where water would likely to be, like the base of the pump and inside the bucket.

Once this was completed, I started modelling a plinth for it to be displayed on. I used all of the techniques I had used for the previous assets to create a quick makeshift plinth with subtle details sculpted in zbrush:

Wednesday, October 16, 2019

Water VFX: Week 3 Wednesday

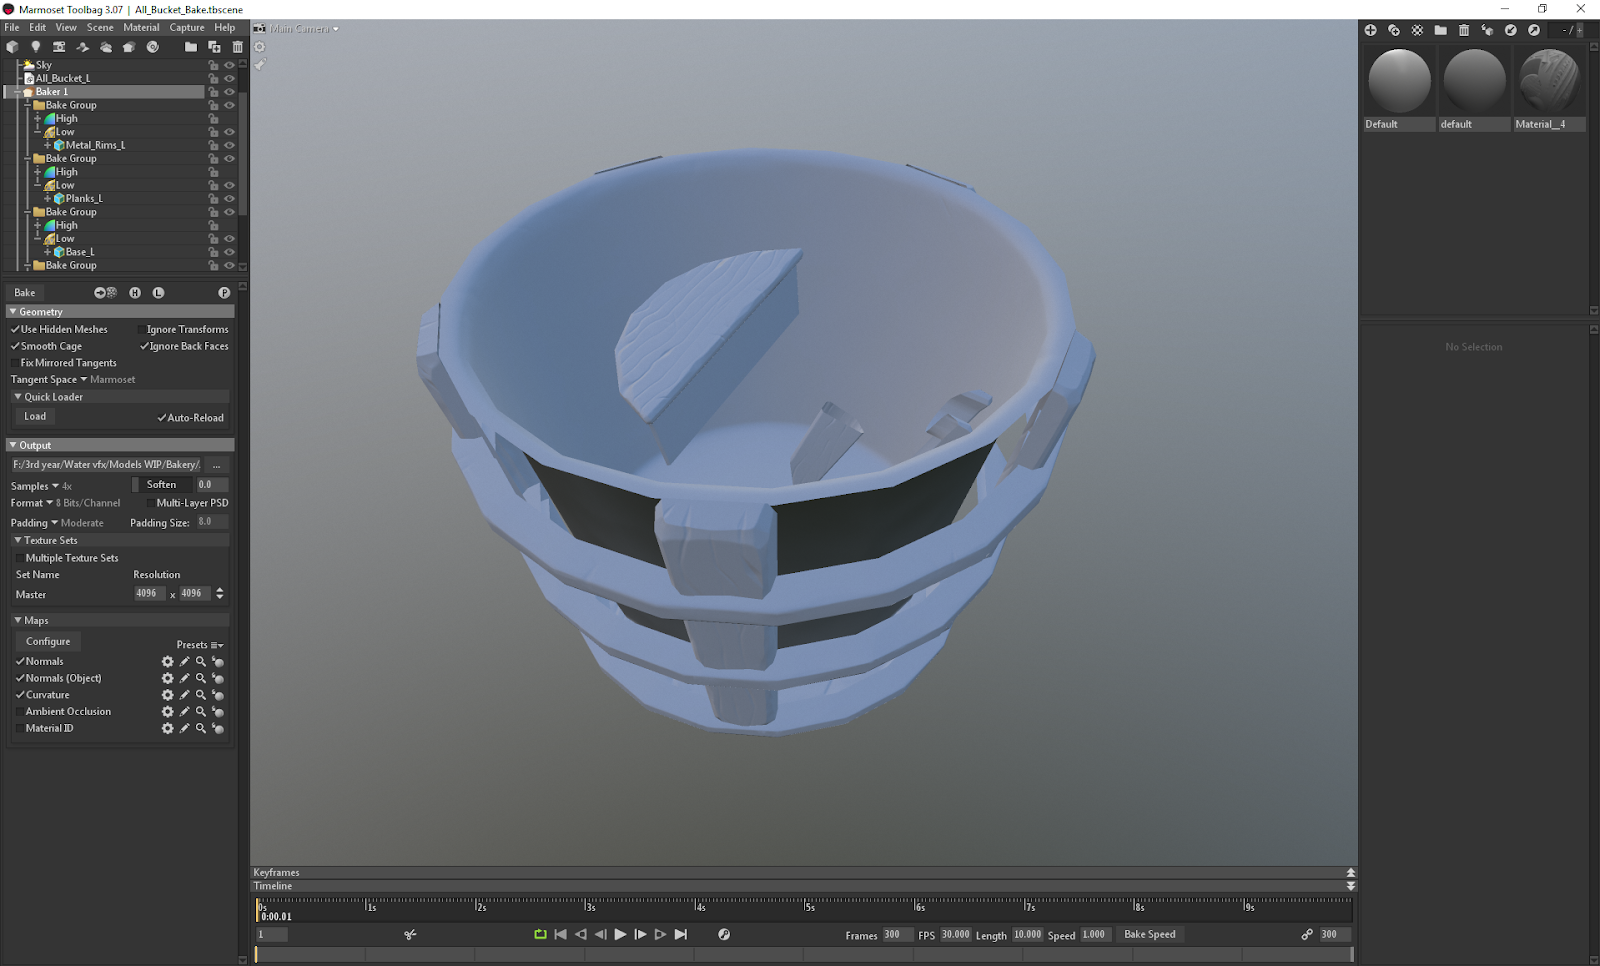
On Wednesday I unwrapped the lowpoly and exported both versions into marmoset as .OBJs to bake.
I made sure that the unwrap was packed tightly by using Pack Normalise and then further optimizing the used space by hand. This also helped to ensure that each item had a consistent texel density. I made 3 maps, one for the pump, one for the bucket and one for the water. I also used flatten mapping to create a light map:

(islands temporarily moved to show multiple unwraps at the same time)

I chose marmoset instead of substance painter for this as marmoset has the option to paint edits onto the cage in the viewport and to live update the maps at any point in photoshop. It's also easier to seperate bakes so that they don't print onto unwanted sections:
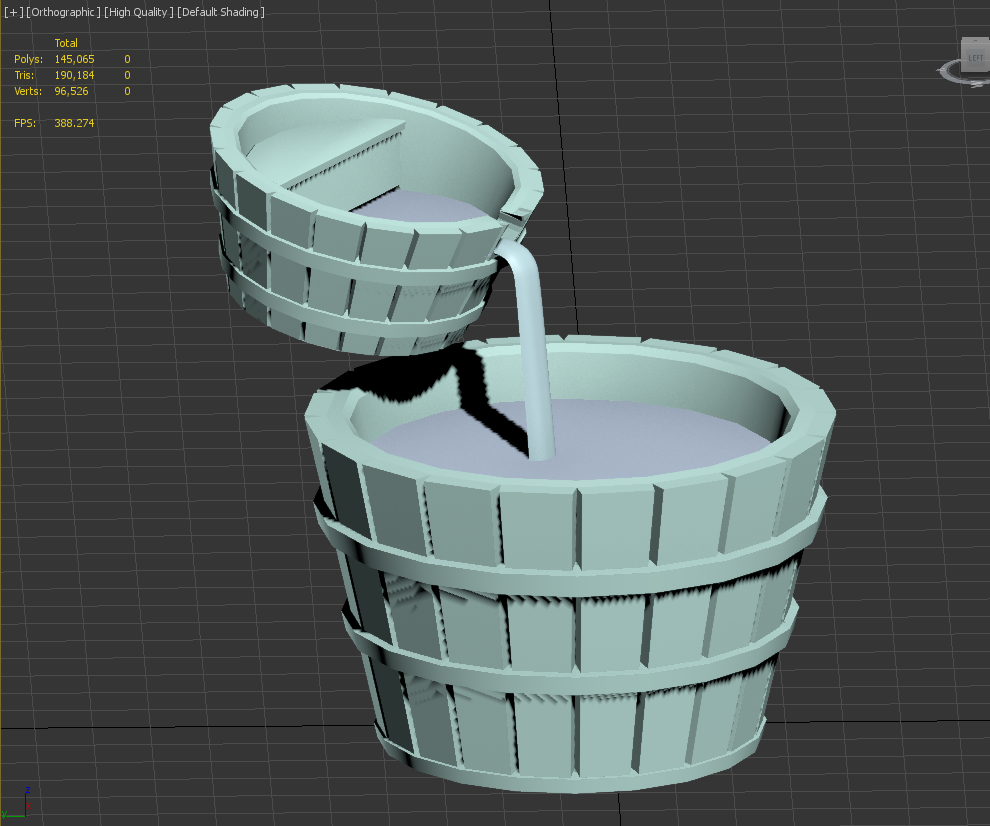
I placed the normal map onto the base colour in the material editor so that I could check that the copied planks weren't obviously repeating (two of the same planks next to eachother), then I started making the hole for the small bucket. I added some swiftloops, cuts and insets until I could delete planes in the shape of the hole that the water would go through while being careful not to distort the bake.

Tuesday, October 15, 2019

Water VFX Brief: Week 3 Tuesday

On Tuesday I finished up the sculpt, decimated and exported it back into 3ds max for retopology. I only sculpted 5 planks to save time, with the intention of copying and rotating them later to fill the gaps. I also copied it across to create the smaller bucket of water, sculpting another specific plank to replace the area where the spout of water would come out from:


I also sculpted the extra planks of wood that needed to be added to the smaller bucket where the pump would be placed. I decimated again and combined all of the highpoly items into 2 seperate buckets ready for the 2 lowpoly versions to be created:


Monday, October 14, 2019

Water VFX Brief: Week 3 Monday

On Monday I continued modelling more of the assets to go with the VFX. I started on the water pipe and used turbosmooth to increase the poly count, making sure to keep the game-ready lowpoly version on hand to bake onto later:


Once this task was completed, I moved onto zbrushing the planks for the wood. I decided to use zbrush for the more organic materials in the scene, while the water pump would only be modeled in 3ds max.
I exported my bucket as a .OBJ with the zbrush preset so that when I loaded it into zbrush it could be split into subtools based on groups, making the sculpt neater:

Disclaimer: For the cracks, slashes and metal texture I used the Orb_Slah_Curve, Orb_Slash_clean, Orb_Flatten_EdgeProtect and Orb_hammeredMetal brushes from the zbrush orb brush pack. The remainder was sculpted using hpolish, trim dynamic, pinch, move, nudge, dam standard, slash and smooth tools.

Friday, October 11, 2019

Water VFX Brief: Week 2 Friday

Now that all of the water was out of the way, I started working on the water feature model itself.
I wanted to combine these aspects into a cute stylised plinth:
Image result for Fountain
Image result for water pump
The style was based somewhat on this:
Related image
Image result for sea of thieves plantsImage result for sea of thieves plants
Simple stylised texturing, with some some bold, chunky details sculpted in and PBR used to a realistic degree.


I started with the lowpoly sculpts of the buckets and the water, which I then turbosmoothed to allow for more dynamic fluidity in the material editor later.

Thursday, October 10, 2019

Water VFX Brief: Week 2 Thursday

On Thursday I worked on my final particle effect, which was to be an interspersed stream of droplets falling down from the top of the waterfall based on these reference images:
Image result for Fountaincascadas de jardin modernas - Buscar con Googlesmall pond and water garden

My first issue was that the droplets were a little too round and looked like little beans falling down, so I tried adding a ribbon emitter to fill out the gaps at the top and taper out:

This made it a little better, but it looked a little too ribbon-like for my tastes, So I removed it again and this time focused on size by speed, which made the droplets more oval-shaped, which made them seem stretched by gravity, or in clumps rather than separate balls: